Imagine that you are a detective who has just received a complex case: instead of searching for a criminal, you are investigating the real needs and motivations of users. Like a true detective, you analyze the "crime scene" (interface or product), gather evidence (feedback and observations), interrogate witnesses and "suspects" (users, stakeholders), seeking to uncover hidden motives and pains. To solve this "case," you need to ask a million "why?" and "for what?", filtering out the noise and separating the essential from the secondary. When you finally piece together all these clues, a clear picture will emerge before your eyes: design solution that fully meets the actual demands of users.
Although you may not be able to delve into all the details right away, you will gain a clear overall picture and see many real examples — no "dry" theory! You will undoubtedly be surprised that the overwhelming majority of a UX designer's work is dedicated to communication and research, rather than visuals. And only when we know exactly for whom and what problem we are solving does it become time to design the interface.
Mostly in this and the next lessons we consider the role of a UX designer, although in small companies the tasks of UI are often emphasized. For example, they might say "quickly create a landing" or "update the design" in just a few days, which reduces UX efforts to a short brief. But even if a full UX process doesn't happen often, it's worth knowing it.
- Who is a UX designer?
- What fundamental task does a UX designer solve?
- Why must a UX designer be able to and enjoy communicating?
- What is the design process?
- Stages of the design process and what are design activities?
- Stage 1 (Observe or Empathize). Observation or empathy. How to understand what the user lives for?
- Stage 2. Defining problems (Define). What tasks and goals does the user have?
- Stage 3 (Ideate). Finding solutions. What options are there for solving the given tasks?
- Stage 4 (Prototype). Prototyping. Implementing the best ideas
- Stage 5 (Test). Testing. Checking what works
- Repeat if necessary
- Double Diamond concept
- How to build your design process?
- A typical day of a UX designer
- Homework
- Conclusions
Who is a UX designer?
UX designer is a specialist who creates a product (digital or physical) taking into account the user experience. Their goal is to understand the needs, behaviors, environment, and motivations of people. Then, they create solutions that are convenient, effective in solving problems, and pleasant to use. To achieve this, the UX designer conducts research, develops prototypes, tests hypotheses, and improves the product based on feedback from users.
What fundamental problem does a UX designer solve?
The key task of a UX designer is to find a balance between the interests of the business and the real needs of users. On one hand, the product must align with the strategic goals of the company (i.e., be profitable), while on the other hand, it should provide practical value, helping the user solve specific tasks quickly and easily.
Why a UX designer must be able to and love to communicate?
You will have to communicate a lot. There are exceptions, but in most cases, 25–50% of the time is spent precisely on “extracting” information from various responsible persons and assembling it into a single puzzle. Let's take a closer look at why communication is so important:
- Working with the team and stakeholders. The UX designer does not work in a vacuum: they constantly interact with managers, developers, clients, and sometimes even investors.
- Gathering information from users. Most UX research involves communication in various formats – interviews, surveys, and so on.
- Defending ideas. To gain team support for proposed design solutions, it is essential to clearly explain their value and usefulness, to "sell" one's own idea.
All of this makes communication a critically important skill for a successful UX designer. It is considered one of the most important soft skills. If you find it difficult to communicate, this could become a problem.
What is design thinking or the design process?
Design process is a structured approach to creating a new product or improving an existing one. Its goal is to find an effective, convenient, and user-oriented solution. There are many variations of the design process, but they all rely on sequential steps: explore, define the problem, generate ideas, create prototypes, and test to find the best solution.

Often the designer returns to previous stages and goes through some steps again. For example, during testing, it became clear that the prototype is unclear to users and they cannot solve their problem with its help. In this case, we can go back two stages to the ideate phase, taking into account the identified problem.
I want to draw attention to the fact that such multi-stage design processes, which we are going to consider now, relate to complex products and problems that are unknown how to solve in the initial stages. Returning to examples of relatively simple tasks, this does not apply to landing page design or a simple online store. After all, everything is already clear there. That is why this work is done by web designers. Moreover, this does not pertain to creating banners or brochures. This is done by graphic designers. And we are future UX designers, and we do not draw just for the sake of making things look nice (even though that is important too); we design and solve complex problems.
Design activities or design research – are a set of practices, methods, techniques, and tools that assist the designer at various stages of the design process: from in-depth study of user needs and behaviors to idea generation, prototyping, and testing. These can be simple techniques (sketching, drawings on paper, or short interviews) as well as specialized digital platforms (Figma, Axure, etc.). The main thing is that all of them are aimed at a deeper understanding of the problem and creating an effective solution.
For you, as a designer, to know what interface to create (which screens, input fields, buttons, other elements), you need to research what tasks the user is solving, in what context they are acting, and what specific needs or constraints they have. Here’s an example: how can you design an interface for ordering a car (configurator) if you don’t know how it works and what options exist when ordering a car? This is where the activities from the first stage of the design process come in handy.
Next, it will be very interesting because for each stage I will provide you with examples of how a specific activity can be applied and what results it can yield. Remember that depending on the project, some stages may be skipped, and some activities may be too expensive or take too much time, making them impractical to implement. We will talk about planning your own design process at the end of this lesson.
Stage 1 (Observe or Empathize). Observation or empathy. How to understand what the user experiences?
In the first stage, we try to understand the real needs, motivations, and context of the target audience. The designer needs to "immerse" themselves in the user's environment to feel the problems they face and the tasks they are solving. Popular design activities at this stage include:
Domain Research
What is it? Studying the specifics of the relevant market sector (finance, medicine, manufacturing, etc.): terminology, competitor analysis, trends, and so on. This includes googling unfamiliar terms, researching product documentation, looking for user reviews, studying the subject to fully understand why and how everything works.
When is it applied? When the designer does not understand the subject area and needs to delve into the details. For example, you are developing a web application for managing your own investment portfolio. You need to understand what types of asset classes exist, how they interact with each other, and how they affect risks and returns. Master financial metrics: ROI, IRR, P/E, dividend yield. And this is just a small part of the knowledge required in this field. You can search for information in search engines, as well as in financial books, forums, competitors (similar existing products), etc.
Result. A deep understanding of the context in which the product will exist. It allows you to communicate with specialists in this field (clients, developers, users).

Examples of Use and Benefits Achieved
- While developing an app for ordering cleaning services, I reviewed the feedback in the App Store of competitors, where users complained about not seeing the contents of cleaning agents. Now, our interface includes details about each product and the option to choose an "eco" option.
- When I was making a mobile app for accounting, I studied the basic tax legislation norms and simultaneously read comments from private entrepreneurs on social media, who often got lost among invoices. As a result, we simplified the interface: we created a separate section for tax payments with automatic reminders about deadlines.
User Interviews
What is it? Personal face-to-face or online meetings where users share their experiences, pains, and expectations. It is conducted according to a pre-created plan (also called a script) and consists of open-ended questions (the answer cannot simply be yes or no) about past experiences in solving the given task. In such interviews, it is important to ask clarifying questions (how, why) to dive deeper into the problem and get to the essence.
When is it used? At the beginning of the project, to learn about the "pain" points that users encounter. For example, you need to develop a system for patient accounting in a hospital. To do this, you need to clearly understand the stages each patient goes through, what information is important for doctors, and how much time it takes. Interviews with healthcare staff are ideal for this.
Result. Qualitative insights into user needs, their pains, problems, and tasks. One of the most valuable sources of information.

Examples of Use and Benefits Obtained
- While working on a fitness application, I spoke with people who are just starting to train. They shared that they often do not understand how to perform exercises correctly. So we added video instructions and step-by-step tips.
- While creating a note-taking tool, I met with freelancers who work on several projects simultaneously. They said they needed a simple way to group ideas by topics. We added a feature for virtual "folders" with the ability to set a color and icon, so everyone could navigate their to-do lists more easily.
- In the e-book reading app project, I talked to avid readers and found out that they often lack the ability to make notes or highlight quotes. Thanks to this feedback, we added a convenient notebook where users can immediately save their favorite excerpts and share them with friends.
Observation (Field Studies)
What is it? Subtle observation of users in their typical environments. They allow us to see the real behavior of people and the unnoticed nuances of product or service usage in the office.
When is it applied? In the early stages, to rethink design tasks and goals. Also in later stages (evaluation of the finished product), to check how the product is used in real conditions.
Result. Discovery of hidden behavioral patterns and problems that users may not be aware of themselves.

Examples of Use and Benefits Obtained
- While working on a home recipe app, I observed people as they cooked. It turned out that their hands were often busy or covered in flour, making it inconvenient to scroll the screen. After that, we added a voice control mode and large one-touch scrolling buttons.
- While working on a system for store managers, I visited a supermarket and watched how the administrators changed price tags and checked the stock of goods. It turned out that they preferred using a tablet rather than a desktop computer because they needed to move frequently between the shelves. So we adapted the interface for mobile devices.
- I planned to improve the design of the electronic journal at school. I entered a classroom and observed how teachers used it during the lesson. It turned out that they hurriedly entered grades, and any extra window annoyed them. Therefore, I simplified the interface to a single table with rows for students and columns for quick grade entry.
Stage 2. Defining Problems (Define). What tasks and goals does the user have?
In the second stage, we formulate clear problems that need to be solved based on the information we obtained in the first stage. Here, we structure the ideas and insights gained during previous research. There are many methods to structure, describe, and document the problems and tasks of users. Additionally, a separate important part consists of prioritization methods, which means identifying the most critical problems. We will not cover them in this lesson, but know that they exist. Here is a list of some of them: RICE, Kano, MoSCoW.
Problem Statement
What is this? A brief description of the essence of the users' "pain" that needs to be solved, based on previous research. Usually, a few sentences are enough to describe one problem. Within one project, several problems can be formulated.
When is it applied? After conducting interviews with users, observations, subject research, and analysis of all this, a general picture should emerge. This activity is conducted based on that.
Result. A specific "what" and "why" we are addressing along with important details.

Examples of Defined Problems
- Subscription Management Tool for Various Services. Users forget about their active subscriptions and continue to pay for unnecessary services. The problem is that there is no single place to control all subscriptions and their costs.
- Career and Vocational Guidance Platform. Future applicants have no idea how their choice of profession relates to the job market. The problem is the lack of a clear comparison of specialties, future predictions, and necessary skills for each field.
- Mobile App for Ordering Medications. People who need to quickly buy medical supplies do not always know which pharmacy has the needed product and what its price is. The problem is the lack of a convenient way to check availability and place an order without leaving home.
User Stories
What is it? A brief description of the value that the product provides to the user (in the format “As a [user role], I want [action] so that [benefit]”). This concise format allows for describing both general tasks of the product and small features. Such stories are often used not only by designers but also by managers and product owners.
When is it used? When gathering requirements to help the team understand the usage scenarios.
Outcome. A list of stories that helps maintain focus on what is valuable for users. Typically, during the development of a project, you may have several dozen user stories to cover the main functionality of the product. Remember that each story addresses a specific problem or enables the user to achieve their goal.

Examples of User Stories
- I as a city dweller want to book a parking space in advance through the app so that I don't waste time looking for a free parking spot.
- I as a student want to view comparisons of majors and university conditions to choose the best option for continuing my education.
- I as a gym visitor want to receive reminders about my workouts so that I don't miss classes and stick to my schedule.
User Personas
What is it? Conditional "portraits" of different types of users with descriptions of their characteristics, needs, motivations, and pain points. It allows for the creation of distinct user types based on their characteristics, such as age, gender, profession, marital status, hobbies, and so on. It can include specific parameters that are important for your product. For example, body mass index for a fitness app or the presence of a pet for a pet-sitting service.
When is it applied? After collecting a sufficient amount of data and when it becomes clear that users can be categorized into one or more categories with unique characteristics. And while this is a very popular method, sometimes UX designers forego the use of personas in favor of, for example, Jobs to Be Done. This approach describes not users, but specific tasks. Here are a few examples.
- If we are developing a product for a broad audience, for example, a social network, it becomes obvious that our user can be anyone, and applying personas here will be difficult.
- However, if we are developing a tool for teachers and students, personas will help delineate basic and advanced usage scenarios: what is needed for conducting interactive classes, how to best set up homework checks, and so on.
Result. Visualization of target users that helps the team understand for whom they are designing.

Person Examples
-
Denis, 21 years old, IT faculty student
Motivations: to learn new technologies, to improve skill levels for future work
Needs: convenient courses with real cases, discussion of tasks with mentors
Pains: unstructured information, lack of practical application of theory -
Maryana, 56 years old, history teacher
Motivations: to make learning interesting for students, to use modern methods
Needs: a platform with structured material, ability to add interactive tasks
Pains: excessive technical complexity, inability to quickly adapt content -
Max, 34 years old, sales manager
Motivations: to increase deal volume, to quickly obtain fresh data about clients
Needs: CRM with a simple interface, quick access to contacts and interaction history
Pains: unstructured client lists, data duplication or loss
User Journey Mapping (Journey Mapping, Customer Journey Map)
What is it? A schematic representation of the path that a user takes while interacting with a product, service, or company. CJM helps to understand the user experience, their emotions, needs, and pain points at each stage. The main goal of this map is to identify issues faced by users and find ways to resolve them to improve the overall experience with the product.
It displays the key touchpoints of the user with the product in the form of a step-by-step table, as well as the emotional states and actions that the user takes at each stage. The map may also include data about the context, user goals, and barriers that hinder the achievement of these goals.
When is it applied? When it is necessary to see where in the interaction chain the user encounters barriers or emotional peaks. This research allows for a very detailed examination of what exactly a person does when trying to solve their problem. If a product is being developed for multiple personas, such as a teacher and a student, then we will have multiple paths for each role. In complex cases, there may be several journeys even for one role.
Outcome. A list of touchpoints, pain points, and opportunities for improvements.

Example of user journey mapping for ordering food through a delivery service
-
Step: Choosing a restaurant
Action: The user browses the list of restaurants in the app.
Emotion: Anticipation.
Pain: Incomplete information about the menu. -
Step: Choosing dishes
Action: The user adds dishes to the cart.
Emotion: Satisfaction.
Pain: Lack of photos of the dishes. -
Step: Payment and confirmation
Action: The user enters card details and waits for delivery.
Emotion: Anxiety.
Pain: Long waiting time.
After identifying significant user problems and tasks, we move on to brainstorming ideas on how to solve them and evaluating those ideas. At this stage, there are numerous methods. Let's consider the most interesting ones.
How Might We…?
What is it? A method of posing creative questions that help find innovative solutions to specific problems. The phrase "How might we" creates a positive mood and stimulates idea generation, emphasizing the possibility of achieving results. For example, instead of stating "Users cannot quickly find the needed feature," one could formulate the question: "How might we make access to the feature quick and convenient for users?" This method helps the team focus on exploring options and expands the boundaries of thinking.
When is it applied? After the problem has been clearly defined.
Outcome. A set of tentative directions to "dig" for idea generation.

Examples of HMW Questions and Ideas
Language Learning App
HMW: How might we integrate gamification elements and social interactions so that users feel progress and do not lose motivation?
Example Solutions:
- "Quest" lessons with difficulty levels: users earn points or coins, advance to higher levels, unlock bonus tasks.
- Group chats / challenges with friends, where everyone receives a daily task and can compare results.
- Automatic level assessment based on test results, so challenges are always "a bit harder" than current skills.
Balanced Meal Delivery Service
HMW: How might we offer a balanced menu, built around users' dietary preferences, without complicating the ordering process?
Example Solutions:
- Smart diet filters (vegetarian, keto, gluten-free, etc.) that immediately create a set of dishes from various restaurants.
- "Try for a week" — users subscribe, and the service automatically selects a daily diet considering calorie intake.
- Loyalty system with personalized discounts (for example, if users support local establishments).
Personal Finance App
HMW: How might we help users establish healthy financial habits by making expense and savings tracking simple and even enjoyable?
Example Solutions:
- Automatic categorization of expenses (groceries, transport, entertainment) with real-time infographics.
- "Financial challenges": challenges like "Save 10% of income" or "Spend less on coffee".
- AI tips and suggestions: the app analyzes spending patterns and offers helpful habits (for example, paying bills on time).
Brainstorming (Brainstorming)
What is it? A collective "storm" of a problem, where everyone can propose an idea without criticism from other participants. The main goal of brainstorming is to generate as many ideas as possible in a short time, avoiding criticism and evaluation at the initial stage. Participants can freely express even the boldest or unconventional ideas, fostering creativity. The process usually consists of two phases: idea generation and the subsequent selection of the best ones for further processing. The method is effective in solving complex tasks and stimulates teamwork.
When is it used? At the beginning of the idea generation stage.
Result. A list of diverse (sometimes even unusual) ideas, which are then evaluated and grouped.

Examples of ideas generated during brainstorming
- Create an interactive map to display user locations in real-time.
- Integrate gaming achievements (badges, trophies) for successfully completing tasks or goals.
- Add a personalized recommendation feed based on user behavior and preferences.
- Implement integration with a chatbot for quick consultations or customer support.
- Utilize a voice interface so users can execute commands without manual input.
- Introduce a "daily challenges" mechanic with automatic statistics and result analysis.
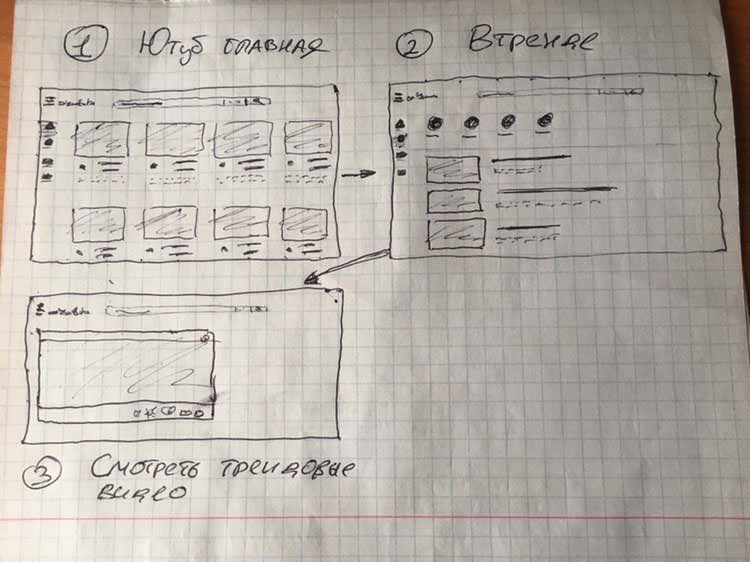
Sketching (Sketching)
What is it? Quick visual capture of ideas on paper or in digital form. In UX design, sketching is used to quickly depict interfaces, page structures, or key product features. The main goal is not to create a perfect design, but to convey a concept and provide a foundation for discussion within the team or with clients. Sketching helps to quickly explore different options, reducing time and resource costs on complex layouts. It is a simple yet effective tool for the initial stages of design, fostering creativity and collaborative decision-making.
When is it used? During or immediately after brainstorming to quickly illustrate possible interfaces or concepts.
Result. Initial visual concepts that are easy to share and discuss. They may resemble very simple wireframes.


After selecting the best ideas, we move on to their implementation in the form of designs with varying levels of detail for further testing. Depending on the available budget and time, these can be low-fidelity static mockups with few details or detailed interactive prototypes that look like a finished product.
But even before creating simple wireframes, it can be useful to create a conditional diagram and show which screens the user will encounter to complete their task. For example, to buy something in an online store, you need to find the product, add it to the cart, provide the shipping address, and make the payment. That's at least three screens (product page, cart, checkout).
In the next lesson, we will become very familiar with the types and nuances of creating user flows and wireframes, but for now, here is a brief description.
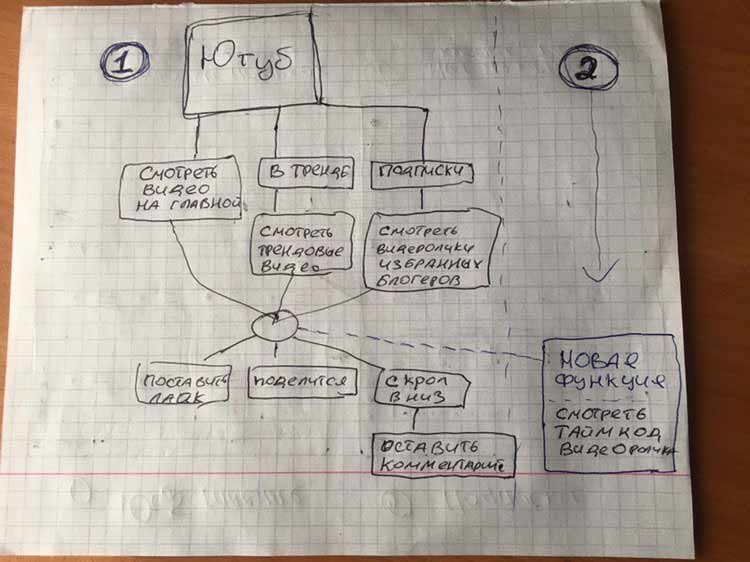
User Flow
What is it? A visual diagram of the sequence of steps that a user takes within a specific scenario. A user flow can have branches, meaning the user can take different paths and see different screens. For example, if the payment is successful, there will be one message, but if not, there will be a completely different one with buttons to resolve the issue (retry payment, enter a different card).
When is it used? Before or during the creation of wireframes to align the logic of transitions between screens.
Result. A clear structure of transitions between the product screens.


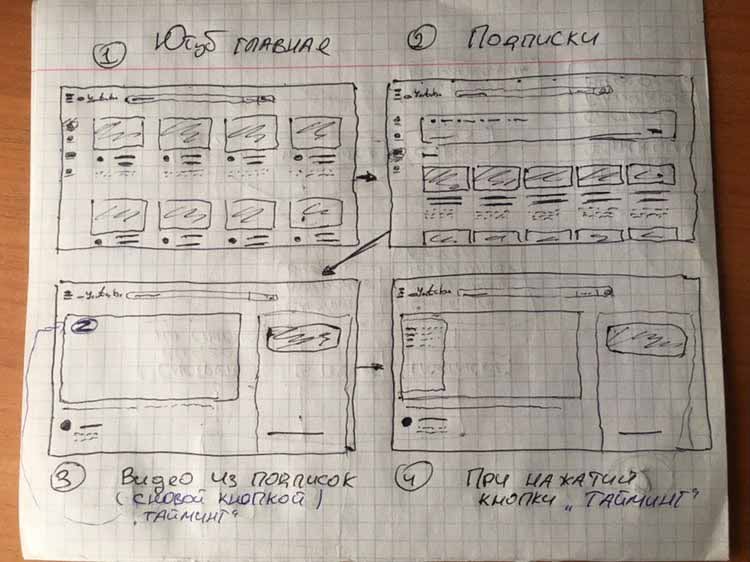
Wireframes
What is it? Layouts of screens that show the placement of key interface elements (buttons, form fields, image placement, and so on). There are Lo-fidelity (low detail) – simplified diagrams, Hi-fidelity (high detail) – which resemble the final design.
When is it used? Lo-fi – at the beginning, to quickly test ideas; Hi-fi – when the logic has already been refined.
Result. A set of screens understandable to all team members that can be quickly adjusted.


When is it used? When a good idea has been chosen and it needs to be thoroughly tested. It allows checking the logic and usability of the interaction before involving real developers, which significantly saves the budget.
Result. Almost a "live" experience, where you can navigate between screens, fill in fields, etc. It allows testing the chosen solution and ensuring that it effectively solves the problem.


At the final stage, we check how well the created prototypes meet users' needs and whether they truly solve their problem. They allow us to understand what changes need to be made to further improve the product. Therefore, after testing, designers return to the prototypes and refine them, as it is usually very difficult to create a perfect solution on the first try.
Guerrilla Testing
What is it? A quick and informal method of testing prototypes or designs "on the go" with random people (often in crowded places like cafes, shopping malls, etc.). This can include paper prototypes where you show sketches on paper and ask what a user would do to solve a given task, as well as interactive prototypes in Figma.
When is it used? When there are initial prototypes for testing and significant time constraints.
Result. In a short period of time, you can check how understandable the interface is, whether there are issues with interaction scenarios, and immediately gather initial ideas for improvement. Of course, Guerrilla Testing does not replace full usability testing with detailed scenarios and carefully selected participants, but it is a great way to get initial reactions when the product is in the early stages of development or when time and budget are limited.

Usability Testing
What is it? Usability testing (usability) or ergonomic testing is a study to check how convenient it is to use the interface to perform a specific task. Such tests are conducted on real people using interactive prototypes or finished products.
In most cases, the UX designer provides a device with the prototype running, explains what needs to be done, and observes the user. Everything is then carefully noted and analyzed later. Sometimes a recorder is used for comments. After conducting numerous tests, conclusions can be drawn about how successful the chosen solution is or which hypothesis worked better.
Users perform real tasks with the prototype/product, while the designer observes where difficulties arise. Each task is performed multiple times by different users to measure the effectiveness of the solution (how much time was spent, how many mistakes were made, and so on).
There are special services for remote usability testing. There, prototypes are launched on users' computers, and a screen recording is made with voice comments from the participants (sometimes video from a webcam is recorded, so you can even see the user's facial expressions and emotions).
When is it applied? After creating the prototype, before the final development. Or already after the product is created, if we want to improve it and identify issues.
Result. A list of issues and a table with metrics on the effectiveness of solving user tasks. As well as recommendations for improvement.

If Repetition is Needed
As already mentioned, in the design process, there is often a need to return to previous steps to review or improve the developed solutions. For example, during prototype testing, issues may arise that require changes to the initial concepts or even to the problem formulation. If users exhibit unexpected behavior, designers may return to the research stage to better understand their needs, and afterwards adjust ideas or create a new prototype. This approach ensures that the final product meets users' expectations as closely as possible.
Double Diamond Concept
If we analyze all the stages we have just reviewed, we can see that the problem-solving process has a two-step structure: problem exploration and solution creation. Each step includes two phases: divergence (idea generation, exploration) and convergence (analysis and selection of the most important problems and the best approach to the solution).
The model helps to avoid common mistakes by ensuring a deep understanding of the problem and a focus on user needs. It fosters the creation of effective and innovative solutions.
How to Build Your Design Process?
Your design process should be flexible and adaptable to specific conditions, taking into account time, budget, and resource constraints. Not all the stages we covered are necessarily needed in every project. For example, in small projects with a limited budget, the research and analysis stages can be shortened or combined, relying on existing knowledge. At the same time, complex projects may require a more detailed approach with a full cycle of stages.
A key factor in building the process is the balance between the quality of the outcome and the available resources. If there is not enough time or funds, it is important to prioritize the stages that will make the greatest contribution to achieving the project goals. For example, in the case of a limited budget, particular attention can be paid to rapid prototyping and user testing, which allows for quick feedback and product improvement.
The flexibility of the process and the ability to adapt to conditions are key to the successful completion of the project, while maintaining a focus on user needs and core business objectives.
Typical Day of a UX Designer
A typical day for a UX designer consists of various tasks that depend on the stage of the project development. The morning usually begins with checking emails, planning tasks, and meetings. Next, the designer may conduct research: analyzing user data, reviewing analytics, or communicating with users. Part of the day is spent creating prototypes and mockups in specialized tools such as Figma or Protopie. Regular team meetings are held to discuss work results, get feedback, or clarify project requirements. At the end of the day, the designer may engage in testing their solutions, work on improving functionality, or prepare materials for handover to developers.
From now on, this course is designed for independent study and completing homework assignments. I understand that some tasks may not be easy for you.
For additional support, use the chat in Telegram. Here you can ask questions related to the lessons or view examples of correct completion from other students.
The chat is not available for citizens of Russia.
We will practice conducting user interviews from the first stage of the design process (observation). To start, we need to choose a project topic that we will work on. This is a fictional product, but imagine that you will be working on it as a UX designer. Here is a list, choose what you like the most (or you can come up with your own product):
- Mobile fitness application. Tracking workouts, meal planning, motivational reminders.
- Ready meal delivery service. Various diets, subscriptions, personalized recommendations.
- Budget (finance) planning application. Expenses, savings, expense diaries, payment reminders.
- Foreign language learning application. Daily lessons, gamification, social interactions between users.
- Online platform for finding tutors or courses. Teacher ratings, class schedules, reviews, search by specialization.
- Mental health care app. Meditations, stress relief tips, mood diary.
Great! Now you need to create a list of 5–8 key questions that you will ask potential users. Here are a few tips on how to do this correctly:
- Formulate open-ended questions. An open-ended question encourages the respondent to share details, examples, stories. For example, instead of asking "Is it convenient for you to use such a service?" ask: "Tell me how you usually perform this action?".
- Focus on past experiences and real scenarios. Avoid questions like "What if...?". Instead, ask about what the user has already done or is currently doing. Example: "Recall the last time you signed up for a gym. How did that go?".
- Avoid leading questions. For instance, don’t ask: "You probably love shopping online, right?". Instead, it’s better to say: "Tell me about your experience with online shopping. How does it differ from offline shopping?".
- Ask clarifying questions. If the user answers briefly, make sure to find out more: "What exactly was difficult about this process?", "Why did you make that decision?".
- Structure the interview. Introduce yourself, talk about yourself and the purpose of the interview. Start by asking something general ("What apps/programs do you use most often and why?"). Then move on to specific scenarios related to your product/idea. Finally, thank them for their time and explain why it’s important.
Examples of questions:
- Tell us how you currently track your finances/physical fitness/nutrition?
- What are the main difficulties that arise in this process?
- What motivates you to continue or, conversely, what would prevent you from using the app?
And now for the most interesting part! You find a few people who can be potential users of your app and conduct interviews with them. These can be your relatives, friends, acquaintances, and even unfamiliar volunteers that can be found in the chat.
After the interview, you need to write down insights, meaning facts and non-obvious things that allow for a deeper understanding of user needs, things that were not noticeable on the surface. Insights allow you to look at people's experiences in a new way and identify significant "pain points" or hidden opportunities for improving the product.
Next, you go to the chat, find the appropriate lesson, and publish: the product topic, a list of questions, and a list of insights. At first, I will check homework assignments on my own, but later I hope for experienced students. Also, ask questions there and share experiences. Good luck!
Conclusions
Hello! You have just completed one of the most challenging yet exciting lessons of the course. Now you have an idea of what it means to be a UX designer in real life — with all the new terms, challenges, and discoveries. Remember that without practice, any theory loses its meaning, so study the material and be sure to complete the homework. Ahead are even more exciting topics before we move on to Figma. I promise, it will get even more interesting!


https://www.figma.com/file/nvSYfkq63m2kn0QDaZHriK/%D0%9D%D0%B0%D0%B2%D1%87%D0%B0%D0%BD%D0%BD%D1%8F-%D1%83-Frusia.Pro?type=design&node-id=0-1&mode=design&t=iFwMGBcfNgKScjtH-0
Comment from frusia.pro:
I left comments on all tasks in Figma, please take a look. In short – you did well with all the tasks, just need to fix some nuances.